Regular Tracks
From CockosWiki
This page needs updating.
Please update the page (How to edit a page?)
If you have updated the page, or examined it and found the information up-to-date, please remove this box.
Contents |
Track Name
This provides an area to type the name of your track.
Folder
Folder Control Button
Folder tracks act like submix busses, but can also graphically alter the tracks sent to it by collapsing and expanding them so they get out of your way when you dont need to see them. Any tracks, whether it be Audio or MIDI, will send to the "parent" folder track. That means the fx on the folder track will be applied to all of it's sub-tracks. That also applies to MIDI tracks and VSTi's.
The status of this icon determines whether a track is a folder track, a track within a folder, or the last track within a folder.
Off:
A track with this icon has no other tracks grouped under it as a folder
On:
A track with this icon is a folder track and has sub-tracks.
(the below appears on tracks under an activated folder anywhere)
Folder Termination icon:
A track with this icon is the final sub-track under a folder.
Folder Collapse/Expand Button
Expanded:
Half Collapsed:
Fully Collapsed:
By toggling this icon we get the following results:
The above is a "flash" presentation and may need to be restarted by clicking it, then right clicking and choosing "play" from the menu.
Routing
The extensive routing options is one of the foremost features of REAPER. You will notice you dont have different track types for "send" "aux" or "bus" tracks. That is because any track can be ANY of these using the appropriate settings.
(from the REAPER user guide section 2.4)
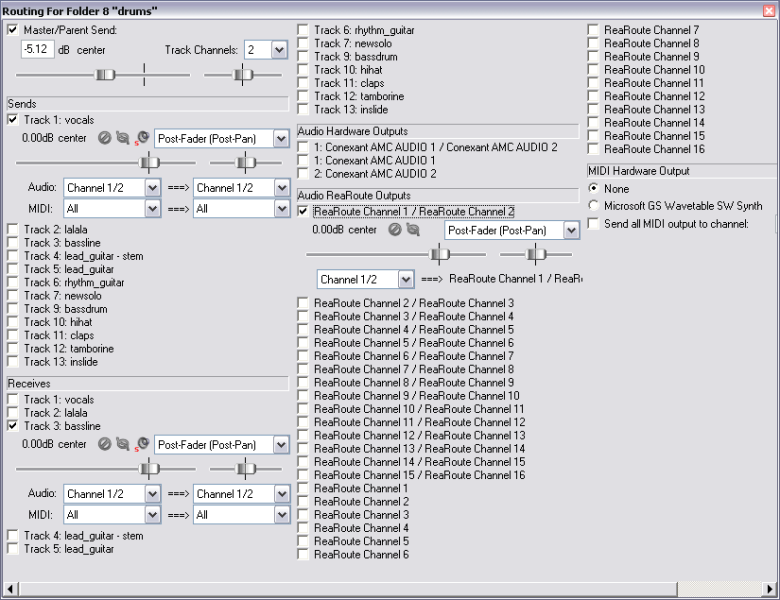
The exact contents of your Track Routing window will vary according to your project structure and your DAW hardware setup (eg sound card and audio devices, MIDI devices etc).
This is a typical setup:
Left Click
- Master / Parent Send – Enabling this ensures that the track’s output will be directed to the Master.
- Sends - This will "send" the track to another track of your choice. By sending it default and unclicink the Master/Parent Send, you are in effect making one track of a submix sent to a parent track. If you are sending to another track and also the master, this is similar to an "Aux" or "Send" track in other DAW programs.
- Recieves - This is the easiest way to set up a submix beside folders. Make one empty track, then left click on the routing button, and simply click the checkboxes next to the tracks you want to "recieve".
- Audio Hardware Outputs – in addition to (or instead of) directing output to your Master Bus, you can also direct output directly to Hardware Outputs on your audio device. If your audio device has multiple outputs, this can be useful, for example, for creating a separate headphone mix, or as series of separate headphone mixes.
- Audio Rearoute Outputs - you may also route a track into another ASIO-compatible program by using the rearoute ASIO driver, and the channel of your choice, select here.
- MIDI Hardware Output – Use this option to direct MIDI output to an external device.
![]() Whenever you select any listed track, audio hardware output or MIDI device to be used for a track’s routing, controls such as Level and Pan are automatically added to this interface.
Whenever you select any listed track, audio hardware output or MIDI device to be used for a track’s routing, controls such as Level and Pan are automatically added to this interface.
Right Click
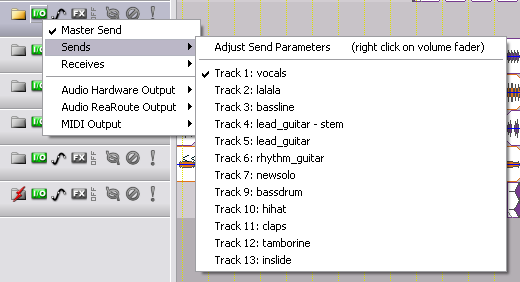
This provides quick one click access to the same options as the left click menu.
A tutorial on multichannel routing is here:
Tutorial_5_-_Multichannel_Routing
a "must-read" for anyone using the powerful routing of REAPER.
Envelopes/Automation
For a detailed explanation of the automation modes, go here Automation Modes
Left Click
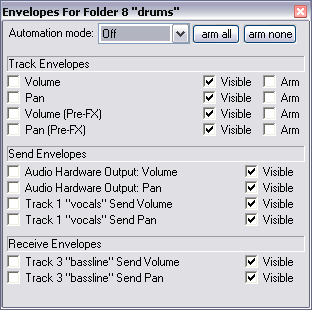
- Automation mode: For more information on the different automation modes, go here: Automation Modes
- Arm All: This will check all of the "arm" boxes for that track. This is helpful in speeding up automation setup.
- Arm None: This will disable all of the arming on that track.
- Track Envelopes: This will enable the "track" control envelopes. This includes the Volume, Pan, and other track controls.
- Send Envelopes: This will enable the envelopes of whatever you are sending to another track. In other words, these envelopes can help you control dynamically the amount of signal SENT to the track you are sending to, and how it is panned, etc...
- Receive Envelopes: Not only can you control the SEND, but you can even control how you RECEIVE signal. Similar to Send envelopes, but the other way around obviously. These envelopes control how sound is manipulated whilst coming IN.
- VST Envelopes: If a VST or VSTi has automatable parameters, these will all show up here as potential envelopes. You can enable them from here as well.
- Enable
This is simply put -- it "enables" the envelope. If this box is not checked, automation will not be read or written.
- Visible
This makes the envelope visible. You dont have to check this if you dont need to actually SEE the envelope. Also handy if you have already finished recording automation, are happy with it, and wont need to see it for a while.
- Arm
This will enable the envelope to be written -- note, you dont have to hit "record" to write envelopes, if you "arm" and envelope, all you need to do is press play and move to your heart's delight.
Right Click
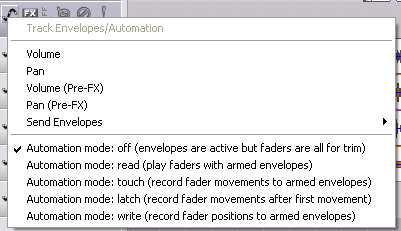
- This is a simplified, quick version of the left click dialog.
- Clicking one of the envelopes will make it visible and enabled.
- You can also quickly select the automation modes this way.
FX
By pressing this button, you can access an fx chain that effects the selected track.
On/Off Button
This will bypass/enable the fx on the master.
Left Click
Opens the fx dialog. More info HERE.
Right Click
This goes directly to the "Add Fx" dialog. More info on that dialog HERE.
Phase
This command will invert the phase of the track.
Normal Phase:
Inverted Phase:
Mute
This command will mute the track.
On:
Off:
Solo
This command will solo a track.
On:
Off:
Record Arm/Disarm
This control determines whether or not a track will be recorded onto by the selected input.
Left Click
This will toggle the record arm button on or off. It will also reveal the track monitoring button, and the VU meter for the track.
Right Click
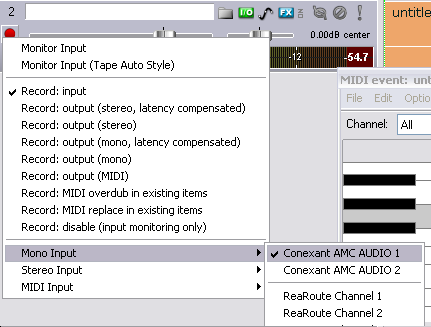
This is a quick menu for choosing monitoring options, record options, and the input selection.
Monitoring Options
- Monitor Input
This will allow you to monitor the hardware input that is selected below, through REAPER.
- Monitor Input (Tape Auto Style)
This is the same as above, except it will not monitor the signal during playback.
There's a nice detailed explanation of monitoring in Reaper, here http://forum.cockos.com/showthread.php?t=54535
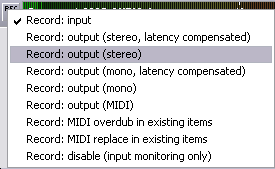
Record Options
- Input
This is your standard record mode. If your input is audio, it will record audio. If it is MIDI, it will record midi items.
- Output (Stereo, Latency Compensated)
This will record the "Output" of a track, in other words, AFTER the FX chain. So if you want to record a VSTi as audio, simply choose this option. It will also re-align the recorded items to be latency compensated.
- Output (Stereo)
Same as the above except without Latency Compensation
- Output (Mono, Latency Compensated)
Same as "Output (Stereo, Latency Compensated)" except its mono.
- Output (Mono)
Same as above except without Latency Compensation
- Output (MIDI)
This will record the MIDI output of a track. When would this come in handy? For instance, if you are using a midi plugin in the fx chain, you may want to record the results of that midi plugin (like an arpeggio or gate) instead of the raw MIDI input.
- MIDI overdub in existing items
This mode will add notes to the existing MIDI items
- MIDI replace in existing items
This mode will replace the notes inside the existing items, without leaving the notes that were there. In other words, it deletes the old notes as you record new ones.
- Disable (Input Monitoring Only)
Input Selection
- Mono Input: Here you can choose from your selected audio device's inputs, as single mono inputs.
- Stereo Input: Here you can choose from your selected audio device's inputs, logically grouped as stereo inputs.
- MIDI Input: Here you can select your enabled MIDI keyboard/controller. To enable a MIDI controller, go here :
Volume Slider
This control will set the volume for whatever track it is situated on.
Right Click
This will allow access to numerical input of the volume, and the "track channels" drop down box. By default it will be set to "2".
Pan Slider
This will control the pan/L-R balance of a track.
Right Click
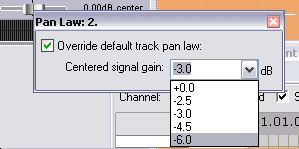
This reveals various different "pan laws" you can use for a given track. For more information on what pan laws are, check this link out:
Volume/Pan Indicator
This shows the current volume/pan settings of the track.
Record Monitoring
Left Click
Toggles the various record modes.
This means there is no monitoring of hardware inputs through REAPER on this track.
This is the normal monitoring mode.
This is the tape style auto monitoring mode.
Right Click
This opens this menu:
Select Record Mode
This shows a mode is being used that records the input.
This shows that no recording will be done on that track.
This shows a mode is being used that records the output.
Left Click
Same record modes as here: Record Options
Right Click
Brings up THIS menu.
VU Meter
Shows the current volume of the track, will turn red at the top if the track clips at input or output.
Left Click
Will bring up the input selection menu:
which is explained HERE
Right Click
Same menu is described HERE
