Tempo mapping with SWS
From CockosWiki
(→About) |
m (→About) |
||
| Line 1: | Line 1: | ||
==About== | ==About== | ||
| - | This is part of Reaper documentation on SWS features regarding tempo and tempo mapping. You need to have [[SWS extension]] installed, version 2.4.0.5 or later. You can get it [http://www.standingwaterstudios.com/reaper here]. All coding by Breeder.<br> | + | This is part of Reaper documentation on SWS features regarding tempo and tempo mapping. You need to have [[SWS extension]] installed, version 2.4.0.5 or later. You can get it [http://www.standingwaterstudios.com/reaper here]. All coding by [http://forum.cockos.com/member.php?u=27094 Breeder]. [https://www.paypal.me/ReaBreeder Support the developer here ]<br> |
==Introduction== | ==Introduction== | ||
Latest revision as of 21:24, 25 September 2018
Contents |
About
This is part of Reaper documentation on SWS features regarding tempo and tempo mapping. You need to have SWS extension installed, version 2.4.0.5 or later. You can get it here. All coding by Breeder. Support the developer here
Introduction
Let's say you have some audio or MIDI which was not recorded to a metronome. Chances are it will not have a constant tempo and you might want to adjust grid to it. If that's the case, read on!
Tip: Use Alt+T to show your master track with tempo envelope.
Where to find them
Open the action dialog (Shift+?), and type in "SWS TEMPO" to see all the tempo features included in SWS.
Tip: You'll often find the actions easier to use if you assign a shortcut to them, or make some buttons for your toolbar (see REAPER User Guide).
(A) Preparations
- Timebase: When tempo mapping, items/envelopes/markers timebase needs to be set to Time to prevent project markers and items from moving when tempo changes are being created. When opening conversion dialog, it will notify you if timebase is not set to time and offer to change it for you.
- Note: After mapping you'll probably want to set timebase back to Beats
- Start position: First tempo marker will have time signature and may create partial measure. To prevent it from creating partial measure move your items in such a way that first beat lands on the start of the measure (start of the project is a good place if unsure).
- Project markers: This method involves adding new project markers. If your project already has markers which you would like to keep, consider using SWS Marker list to save them and restore later.
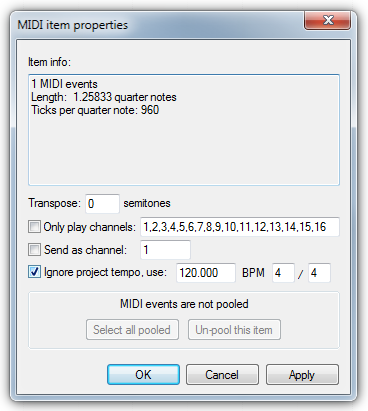
- MIDI items: If you want to tempo map MIDI you will want to enable Ignore project tempo in Source properties (right click item) for those MIDI items and set it to current tempo and time signature. You can do it automatically by using SWS action: SWS/BR: Enable "Ignore project tempo" for selected MIDI items (use tempo at item's start). Once tempo mapping is done, you need to glue those MIDI items to "embed" tempo information into them.
(B) Adding markers
The first thing you'll have to do is put project markers on all beats. Choose the beat-frequency of your taste/need, typically 1/1, 1/4 or 1/8.
Using your pc-keyboard
Play the song from start to finish tapping M on your pc-keyboard (inserting markers on the beat).
You might want to play the song through a second time to check that all markers are in the right place. Edit/add/delete markers until satisfied.
You'll end up with something like this:

Using MIDI
Alternatively you can use your midi keyboard or other midi device (like drum triggers). Arm the track for your input, and tap a note on every beat.
This is convenient for giving a sound to each tap and is probably more accurate when compared to inserting project markers with action.
It may look something like this:

Then run the action "SWS/BR: Create project markers from notes in selected MIDI items".
Tip: You might want to use this action to create project markers directly from the MIDI item you want to tempo map. It is not always a viable option and depends on the type of material you want to tempo map. If you can do it, it is enough copy paste the item and remove all the notes that do not represent a beat.
Using audio transients
You can use an existing audio tracks with transients that reflect beats (typically some part of drums or a click track if you have one) to set the markers.
Depending on the material you might want to:
- Dynamically split the whole item and use action Xenakios/SWS: Create markers from selected items. After that, add missing markers if any, heal splits if needed and proceed.
- Use tab to transient (just type transient in action list to see all the shorcuts) to manually move edit cursor to transients in item and create project markers there.
In any case, don't forget to play with Transient Detection Settings (can be found in View menu or via button in Dynamic split window)
(C) Convert markers to tempo
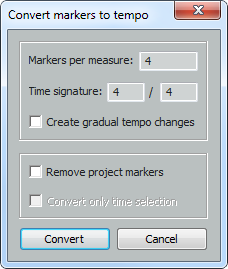
When you're satisfied with the placement of your markers, choose the action "SWS/BR: Convert project markers to tempo"
- Markers per measure: If you tapped on every start of the measure, enter 1. For 1/4 enter 4, for 1/8 enter 8 etc...
- Time signature: Set the correct time signature for your project or time selection. (tips: In some cases 1/4 or 1/8 can be useful)
- Create gradual tempo changes: This will output linear shaped points, and twice as many.
- Remove project markers: Remove project markers after converting (all or time selection)
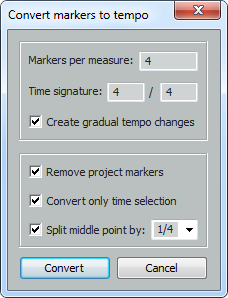
- Convert only time selection: If a time selection is set, you can choose to only convert markers within time selection (necessary for songs with different time signatures)
- Split middle point by: Visible only when creating gradual tempo changes. The purpose is to get a smoother tempo map. Ratio (between 0 and 1) can be typed (decimal or fraction) or chosen from the list. Dictates by how much created markers will get moved from the musical middle. Recommended ratios are 1/2 and 1/3 but feel free to experiment.
Note: Using square output is probably the most easiest method since those points can later be manipulated without any quirks (linear tempo manipulation has certain problematic corner cases). Once completely satisfied, you can easily change them to gradual tempo without disturbing time positions of tempo markers
Square output
For our example (and good starting point if you're unsure), let's use these settings:

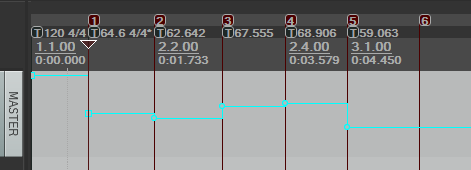
This will output something like this:

Notice:
- First marker will have a time signature and may have "Allow a partial measure before this marker" set, as explained beforehand
- Last marker will have no tempo marker
Linear output
For the same project markers, choosing Create gradual tempo will give this:

Notice:
- Doubling of the points is needed to make linear transitions correct.
- In this case the last project marker will have tempo marker
Linear output, split middle point
For the same project markers, choosing Create gradual tempo with Split middle point checked (here 1/3), will give this:

Notice:
- The number of points is tripled compared to square output. Result is a smoother tempo curve.
Linear output and time selection
Converting project markers to gradual tempo in time selection can have it's quirks due to the nature of linear tempo points. That's why when converting time selection to gradual tempo, these things will be different:
- There will be no tempo marker on the last project marker
- Last created tempo marker will be square.
Sounds a little complicated but it's really not once you get the hang of it. Here is a short example.
1. Tempo map the first time selection:

2. Now tempo map the second time selection:

3. Convert that square tempo marker to linear using SWS actions:

(D) Post-conversion operations
- If you tempo mapped MIDI items, don't forget to glue them. In case you want to remap MIDI items, you can delete tempo markers while preserving time positions of midi events with these actions:
- SWS/BR: Delete tempo marker and preserve position and length of items (including MIDI events)
- SWS/BR: Delete tempo marker and preserve position and length of selected items (including MIDI events)
- Sometimes you will have to fix things up later. SWS includes number of actions for easier manipulation of tempo markers. Most people will be interested in these:
See also
Other methods
There are other methods of doing tempo mapping, see:

