Project Settings
From CockosWiki
Contents
|
Overview
Recordings made in REAPER are saved as Projects. A REAPER project file has the extension .rpp - e.g. MyRecording.rpp. REAPER Project files are saved in plain text format and can be opened, viewed and edited in any text editor.
Project Settings are saved with each .rpp file and are specific to that particular Project. Certain Project Settings override standard REAPER Preferences while the Project is open.
REAPER Project Settings are accessible by selecting File > Project Settings (Alt+Enter).
Selecting the Save as default project settings button will make your changes apply to any new Project.
To learn more about the Project Settings options, see the topics below:
Project settings
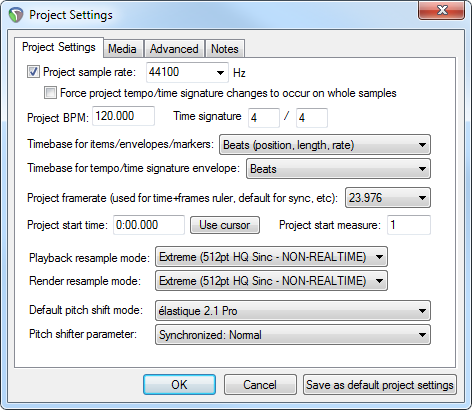
Project sample rate
Select this check box to enable the sample rate to be set by the Project. Select the sample rate from the drop-down box by scrolling and clicking on the sample rate you wish to use:
The list of available sample rates is determined by the capabilities of your audio device.
![]() Note that this sample rate will override the global sample rate set in Options > Preferences > Audio > Device.
Note that this sample rate will override the global sample rate set in Options > Preferences > Audio > Device.
Project BPM
Set the Beats Per Minute setting for the Project by entering a value in this field. The Project BPM setting is used to send Tempo information to plug-ins, to MIDI devices and to set Grid spacing.
![]() Tempo markers added to the tempo map override the Project BPM.
Tempo markers added to the tempo map override the Project BPM.
Time Signature
Set the Time Signature for the Project by entering values in these fields. You may enter any number value.
![]() Time Signature markers added to the tempo map override the Project Time Signature.
Time Signature markers added to the tempo map override the Project Time Signature.
Timebase for items/envelopes/markers
Beats (position, length, rate)
This is the default setting for all new projects. When selected, changes to tempo automatically adjust start and endpoints of all items, envelopes and markers in sync with the grid.
Beats (position only)
This mode is similar to previous, but it does not change media item length, only their time position so start of the item is locked to a beat.
Time
Items, Envelopes and Markers are attached to an absolute time value. When this setting is selected, changes to Tempo or Time Signature settings only affect MIDI items and the grid.
![]() Individual tracks and items can have their own timebase which overrides default project timebase
Individual tracks and items can have their own timebase which overrides default project timebase
Timebase for tempo/time signature envelope
Beats
This is the default setting for all new project. Tempo markers adjust to changes which in turn keeps other tempo markers' musical position constant. This mode should always be turned on unless the other mode is you explicitly needed.
Time
In older versions of Reaper (prior to version 4.25) tempo markers' time position was absolute and it never changed when changing tempo. Instead their musical position changed. This mode will let you get that old and basically "wrong" behavior.
Project start
With many projects you will find that you have a few seconds of recorded silence before the program material (instruments and vocals) actually start. This can create two annoying problems:
- Times shown on the timeline and on the big clock do not accurately represent the time within the song.
- When you go to the start of the project, there are always a few seconds of silence to be played before you reach the start of the song.
Whit these settings you can set project start time as you need it.
Frame rate to use for Time + Frames time display
Select the frame rate that will be used in the Timeline and Transport display (when "Hours : Minutes : Seconds : Frames" is selected) from the list. This affects video.

Resample modes
These settings determine the quality of resampling when some items have different sample rate from the default project sample rate. Better resampling mode means better sound quality but more CPU usage.
Pitch modes
Default pitch shift mode
Here you can select the default algorithm used for pitch sifting. Choices are:
- SoundTouch
- Simple windowed
- Élastique 2.1 Pro
- Élastique 2.1 Efficient
- Élastique 2.1 SOLOIST
When it comes to Élastique, Pro is indented for general purpose, Efficient is less resource intensive version of Pro, and SOLOIST is intended for monophonic signals. For more information see Zplane.de
Pitch shift parameter
Depending on the type of mode selected different choices are presented here. For example, Élastique Pro lets you preserve formants which can help keep pitch sifting sound more natural. You could also select Synchronized modes for Élastique which will help keep things in sync but can introduce additional latency. More information can be found in SDK documentation for Élastique
![]() You should probably experiment with all the different settings to find the right one for your material
You should probably experiment with all the different settings to find the right one for your material
![]() Items can have their own pitch mode set in Item properties and override these default setting
Items can have their own pitch mode set in Item properties and override these default setting
Media
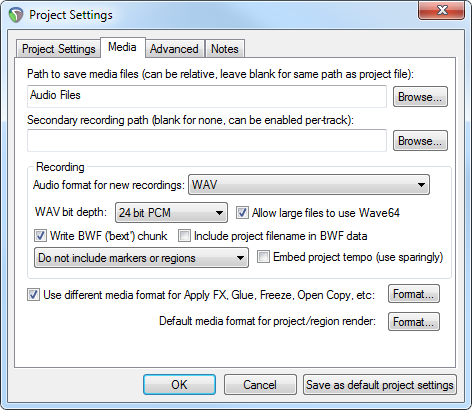
Path To Save Files
Enter a directory path, or select ![]() to navigate to a directory that will be used as the default Save path for all Project-related files. If this field is not set, REAPER will record audio and MIDI files to the default directory listed in Options > General > Paths.
to navigate to a directory that will be used as the default Save path for all Project-related files. If this field is not set, REAPER will record audio and MIDI files to the default directory listed in Options > General > Paths.
![]() Path can be relative. In example presented in the above screenshot everything will be saved to a folder named Audio files in current project directory
Path can be relative. In example presented in the above screenshot everything will be saved to a folder named Audio files in current project directory
Recording Format
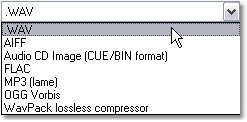
By default, REAPER records to WAV format at a sample rate of 44.1kHz and a bit depth of 24 bits. The Recording Format drop-down box allows you to select the following alternative recording formats:
Currently supported Recording Formats:
• WAV
16, 24, or 32 bit floating point
• AIFF
16, 24 or 32 bit
• FLAC
16 bps
0-8 Quality
• MP3 (once the lame encoder is installed)
CBR, VBR default, VBR old, VBR new, VBR mtrh or ABR Modes
Stereo, Joint Stereo, Multi-Channel or Mono
8 - 320 Constant Bitrate
13 Quality options
• OGG Vorbis
VBR, CBR or ABR
Variable Quality and Bitrate options
• WavPack
16, 24, 32 and 32 bps float bit depths
Variable Modes
WAV bit depth
This section is used to set the parameters of the Recording Format. The information is this section will change depending on the Recording Format you select.
Write "BWF" (text) chunk
This enables a text chunk in the wave file which is compatible with the "Broadcast Wave Format" or "BWF", that allows it to remember its offset and place in a project. BWF format @ wikipedia
Allow large files to use Wave64
This enables usage for the "wave 64" format (wave 64 info here) which, among other things, allows for higher file size (+4GB) than conventional wave formats.
Advanced
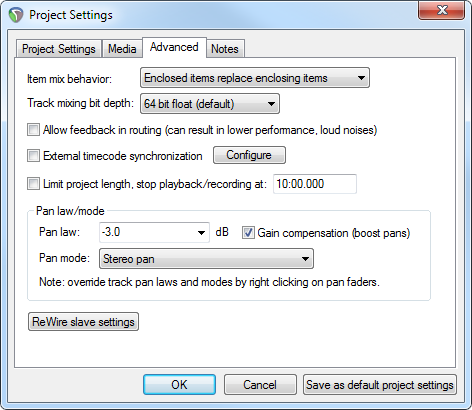
Item mix behavior
Determines how Reaper should behave when one media item is placed directly on top of another. The options are:
- Enclosed items teplace enclosing items
- Items always mic
- Newer item replaced the older item
Track mixing bit depth
Determines what bit depth is internally used by audio engine. It can be considered an esoteric function and should probably be left at 64 bit float if you`re unsure or explicitly need it.
Allow feedback in routing
Select this check box to allow feedback routing. This setting allows you to create a feedback loop by routing signals back to themselves. USE CAUTION when enabling this setting. Feedback is generally not a good thing in an audio system, but can have some uses as an effect. If you must use this setting, make sure you have the Automatically mute master output if volume exceeds -- dB option enabled in Preferences > Audio.
External timecode synchronization
Options to synchronize the project with the timecode of an external device.
Limit project length, stop playback/recording at _ _
Select this check box to limit the length of a Project to the value entered in the field.
Pan settings
Pan law
Select a default Pan Law for each Track from the list.
The Pan Law: determines the amount of level reduction that is applied to a signal when centered -e.g. at a Pan Law setting of -3.0 dB, a signal will be 3 dB lower at Center than when panned fully Right or fully Left.
![]() -3db will give constant power.
-3db will give constant power.
Gain compensation (boost pans): Check this option if you want center to stay at 0bd, while panning increases volume with the above setting.
![]() Have this checked if you want to take tracks in and out of folders without changing the volume of the track.
Have this checked if you want to take tracks in and out of folders without changing the volume of the track.
![]() The default Pan Law is a Project wide setting, but can be overridden by the Pan Law setting available on each Track.
The default Pan Law is a Project wide setting, but can be overridden by the Pan Law setting available on each Track.
Video tutorial: https://www.youtube.com/watch?v=BBeRtAfQlNM
Pan mode
Set the default Pan mode here. See Pan mode for explanation.
ReWire client settings
Settings that determine how Reaper will behave when acting as a client in ReWire session:
- Ignore or process tempo notifications from the master
- Send loop points or repeat change to master
- Set the offset for playback
For more information see article on ReWire
Notes
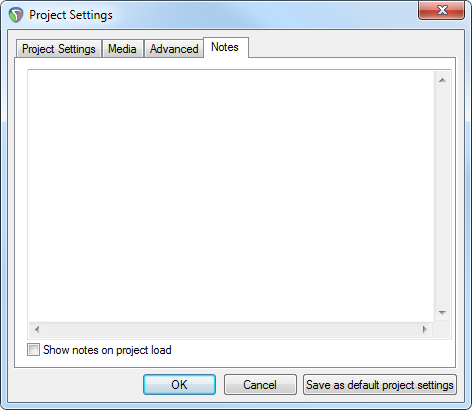
Use this section to write notes about your project -- the checkbox below allows you to display these notes on project load.
Back To:
