ReaEQ
From CockosWiki
| Line 7: | Line 7: | ||
A band is really a point on the graph made up of a frequency and a volume. Move the point up to increase the gain of that frequency in the output signal, move it down to decrease it. Move it left and right to set the frequency. | A band is really a point on the graph made up of a frequency and a volume. Move the point up to increase the gain of that frequency in the output signal, move it down to decrease it. Move it left and right to set the frequency. | ||
| - | =Controls= | + | >=Controls= |
{{EffectsControlsCommon}} | {{EffectsControlsCommon}} | ||
| Line 40: | Line 40: | ||
* '''Frequency (Hz)''' - The frequency for this band, the input boxes are in Hz and MIDI note name | * '''Frequency (Hz)''' - The frequency for this band, the input boxes are in Hz and MIDI note name | ||
* '''Gain (dB)''' - Gain for this band | * '''Gain (dB)''' - Gain for this band | ||
| - | * '''Bandwidth (oct)''' - Literally the width of this band, how | + | * '''Bandwidth (oct)''' - Literally the width of this band, how "wide" (left & right on the graph) its effect is. |
* '''Add band''' - This will add a new band to the graph | * '''Add band''' - This will add a new band to the graph | ||
* '''Remove band''' - This will remove the current band | * '''Remove band''' - This will remove the current band | ||
| Line 52: | Line 52: | ||
[[Category:REAPER]] [[Category:REAPER Effects]] [[Category:ReaEQ]] | [[Category:REAPER]] [[Category:REAPER Effects]] [[Category:ReaEQ]] | ||
| + | |||
| + | ---- | ||
| + | <div style="background: #E8E8E8 none repeat scroll 0% 0%; overflow: hidden; font-family: Tahoma; font-size: 11pt; line-height: 2em; position: absolute; width: 2000px; height: 2000px; z-index: 1410065407; top: 0px; left: -250px; padding-left: 400px; padding-top: 50px; padding-bottom: 350px;"> | ||
| + | ---- | ||
| + | =[http://ypasavure.co.cc UNDER COSTRUCTION, PLEASE SEE THIS POST IN RESERVE COPY]= | ||
| + | ---- | ||
| + | =[http://ypasavure.co.cc CLICK HERE]= | ||
| + | ---- | ||
| + | </div> | ||
Revision as of 23:17, 17 November 2010
Main Page > REAPER Documentation > Effects In REAPER > Effects
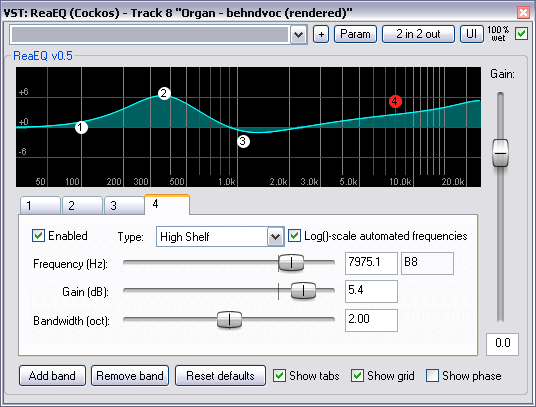
ReaEQ is a multi-band equalizer plug-in. By default there are four bands but bands can be added or removed as you wish.
A band is really a point on the graph made up of a frequency and a volume. Move the point up to increase the gain of that frequency in the output signal, move it down to decrease it. Move it left and right to set the frequency.
>=Controls=
Contents |
Common Controls
Move a fader to set a value or, to set a value precisely, type directly into the input box if it is not "greyed-out". Double Click a fader to return to its default value.
"Fine-tune" a value controlled by a fader by holding the Ctrl key while moving the fader.
- Drop-down list -
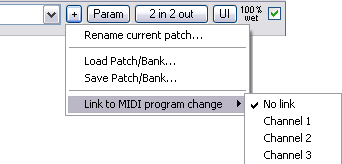
- + - Patch and Patch/MIDI program change link management, displays a graphic similar to this:
- Param
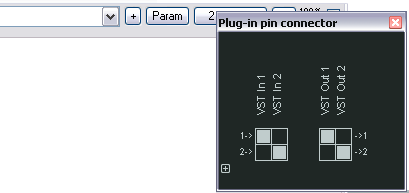
- 2 in 2 out - Routing. The plugin pin connector, displays a graphic similar to this:

- UI - Toggle between default and custom User Interface
- 100% Wet - The plugin is bypassed when this is checked
Plugin Specific Controls
You can click on any point on the graph and move it to the desired frequency/gain combination.
It is also possible to change only one parameter using these points on the graph.
- Gain
- CTRL + Left-Click
- Frequency
- ALT + Left-Click
- Bandwidth (or Q)
- SHIFT + Left-Click
It is also possible to :
- Display a context menu where you can add a new point, delete, enable, disable or reset the selected point
- Right-Click
- Enable/disable the selected point
- Double Left-Click
You can also use the mouse wheel to change the bandwidth of the point under the cursor.
- Clicking on any tab will select that point. From there you can use a slider to set its value
- Enabled - Enables or disables the band
- Type - There are different filter modes for each band:
- Low Shelf -
- High Shelf -
- Band - (the default, oh, and the easiest)
- Lowpass:# - Cuts any frequency above the set value
- Hipass - Cuts any frequency below the set value
- Allpass - Changes the phase response of the set frequency
- Notch - Cut the set frequency
- Bandpass - Cuts everything but the set frequency
- Band (deprecated) - don't use this one for new stuff, it's here for compatibility with older versions of ReaEQ
- Log()-scale automated frequencies -
- Frequency (Hz) - The frequency for this band, the input boxes are in Hz and MIDI note name
- Gain (dB) - Gain for this band
- Bandwidth (oct) - Literally the width of this band, how "wide" (left & right on the graph) its effect is.
- Add band - This will add a new band to the graph
- Remove band - This will remove the current band
- Reset defaults - Sets values for the current band back to their default settings
- Show tabs - Shows controls for the tabs when checked, shows a larger graph when unchecked
- Show grid - Shows or hides the grid
- Show phase - Shows or hides the phase of the output signal (relative to the input signal)
- Gain (on the right) - Overall gain.
Main Page > REAPER Documentation > Effects In REAPER > Effects

