Tempo mapping with SWS
From CockosWiki
(→About) |
(→Where to find them) |
||
| Line 9: | Line 9: | ||
==Where to find them== | ==Where to find them== | ||
| - | Please open the action dialog (Shift + ?), and type in "SWS/BR" or "BR". Select the appropriate action. You'll often find the actions easier to use if you assign a shortcut to them, or make some buttons for your toolbar (see [[REAPER User Guide]]). | + | Please open the action dialog (Shift + ?), and type in "SWS/BR" or "BR". Select the appropriate action.<br> |
| + | You'll often find the actions easier to use if you assign a shortcut to them, or make some buttons for your toolbar (see [[REAPER User Guide]]). | ||
==(A) Preparations== | ==(A) Preparations== | ||
Revision as of 14:28, 3 February 2013
Contents |
About
This is documentation for the Breeders (BR) actions and dialogs regarding tempo and tempo mapping. You need to have the SWS extension installed, version 2.3.0.13 or later [1].
All coding by Breeder. Concepts by Breeder and G-Sun.
Introduction
Let's say you have a mono/stereo/multi-track recorded, by yourself or by someone else. Then, in Reaper, you want to align the tempo-grid to allow yourself to sync and quantize midi and/or audio to the original music. You then need to find the tempo of the original song.
If it was recorded to a fixed tempo, then it's just a matter of finding that tempo. However if it was not, then you need to tempo-map the song. That is what this page is about.
Tips: Use alt + t to show your master track with tempo envelope.
Where to find them
Please open the action dialog (Shift + ?), and type in "SWS/BR" or "BR". Select the appropriate action.
You'll often find the actions easier to use if you assign a shortcut to them, or make some buttons for your toolbar (see REAPER User Guide).
(A) Preparations
Relevant settings
- When tempo mapping, you will always want to have Items/envelopes/markers timebase set to Time because you do not want your project markers to move when conversion process starts creating tempo changes. When opening conversion dialog, it will notify you if timebase is not set to time and offer to change timebase for you.
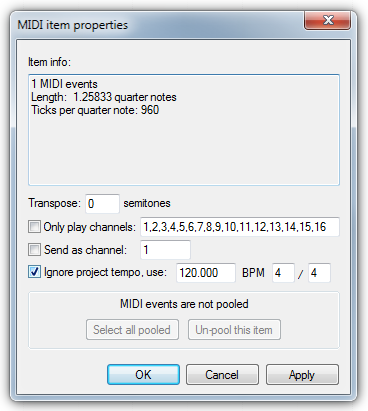
- If you want to tempo map MIDI you will want to enable Ignore project tempo in Source properties (right click item) for those MIDI items. Once tempo mapping is done, you need to glue those items to "embed" tempo information into them.
Timebase explanation
Reaper actually has 2 timebase options which can be found in Project settings:

- First timebase option is the relevant one, while the other is intended for special purposes and should be left alone in most cases.
- Also note that Reaper has separate timebase options for tracks (right click track in TCP or MCP) and items (Item properties) - these can follow project timebase or have their own timebase. By default they always follow project timebase so you should not worry about those unless you explicitly changed them.
- Explanation of timebase modes:
- Items/envelopes/markers timebase:
- Beats (position, length, rate): Project elements will keep their position and length constant as measured in beats. It basically means that things will move and change their length according to tempo to preserve musical position and musical length.
- Beats (position only): This mode is similar to previous, but it does not change media item length, only their time position to make items keep the same musical position.
- Time: This mode will let elements keep their time position when changing tempo.
- Tempo/time signature envelope:
- Beats: Default setting that lets tempo map adjust to changes which in turn keeps tempo markers' musical position constant. This mode should always be turned on unless you explicitly need the other mode.
- Time: Long time ago in a galaxy far, far away, Reaper did not care about tempo - tempo markers' time position was absolute and it never changed. Instead their musical position changed. This mode will let you get that old and basically "wrong" behavior.
- Items/envelopes/markers timebase:
(B) Adding markers
The first thing you'll have to do is put project markers on all beats. Choose the beat-frequency of your taste/need, typical 1/1, 1/4 or 1/8.
Using your pc-keyboard
Play the song from start to finish tapping M on your pc-keyboard (inserting a marker on each place).
You might want to play the song through a second time to check that all markers are in the right place, and that no-one is missing. Edit/add/delete markers until satisfied.
You'll then have something like this:
Using MIDI
Alternatively you can use your midi-keyboard or other midi-device (like drum-triggers). Arm a track for your input, and tap a note on every beat.
This is convenient for giving a sound to each tap and is probably more accurate when compared to inserting project markers with action.
It may look something like this:
Then run the action "SWS/BR: Create project markers from notes in selected midi items".
Note: You might want to use this action to create project markers directly from the MIDI item you want to tempo map. It is not always a viable option and depends on the type of material you want to tempo map. If you can do it, it is enough copy paste the item and remove all the notes that do not represent a beat.
(C) Convert markers to tempo
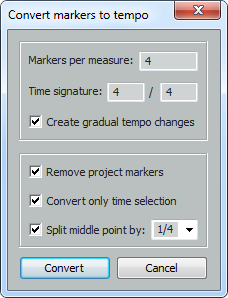
When you're satisfied with the placement of your markers, choose the action "SWS/BR: Convert project markers to tempo..."
Then a dialog will open:
- Markers per measure: For 1/1 enter 1, for 1/4 enter 4 or for 1/8 enter 8.
- Time signature: Set the correct time-signature for your project or time-selection. (Tips: In some cases 1/4 or 1/8 can be useful)
- Create gradual tempo changes: This will output linear shaped points, and twice as many.
- Remove project markers: Remove project markers after converting (all or time selection)
- Convert only time selection: If a time selection is set, you can choose to only convert this time-section (Necessary for songs with different time-signatures)
- Split middle point by: If you've chosen "Create gradual tempo changes" above, this option will appear. The purpose is to get a smoother tempo map. Ratio (between 0 and 1) can be typed (decimal or fraction) or chosen from the list. Dictates by how much created markers will get moved from the musical middle. Recommended ratios are 1/2 and 1/3.
Note: Using square output is probably the most easiest method since those points can be later be manipulated without any quirks (linear tempo manipulation has certain problematic corner cases). And once completely satisfied, you can easily change them to gradual tempo without disturbing time positions of tempo markers
Square output
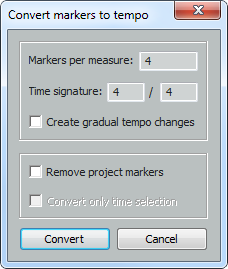
For our example (and good starting point if you're unsure), let's use these settings:
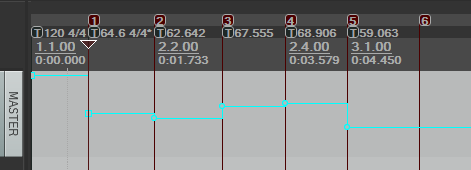
This will output something like this:
Notice:
- First marker will have a time-signature setting and have "allow partially measure before this marker" set.
- Last marker will have no tempo marker.
Linear output
For the same project markers, choosing Create gradual tempo will give this:
Notice:
- Doubling of the points is needed to make linear transitions correct.
- In this case, the first point is set to linear manually prior to running this action.
Linear output, split middle point
For the same project markers, choosing Create gradual tempo with split middle points checked (here 1/3), will give this:
Notice:
- The number of points is tripled compared to square output. Result is smoother tempo curve.
(D) Post-conversion operations
- If you tempo mapped MIDI items, don't forget to glue them.
- You will probably have to fix things up later. SWS includes number of actions for easier manipulation of tempo markers. Most people will be interested in these:
- Moving tempo marker
- Delete tempo marker
- For other methods see the rest of the article on Tweaking tempo
Other tools
Other methods
There are other methods of doing tempo-mapping, see:


