Measure and normalize loudness with SWS
From CockosWiki
Contents |
About
This is part of Reaper documentation on SWS features regarding loudness analysis and normalization. Note that the feature is fully compliant with EBU R128 Loudness Recommendation. You need to have pre-release version of SWS extension installed, version 2.5.1.0 or later. You can get it here. All coding by Breeder. Support the developer here
Loudness analyzer
To open loudness analyzer either run the action SWS/BR: Analyze loudness or go to Main menu > Extensions > Loudness...
Signal flow
Due to API limitations, audio samples can be obtained only from certain parts of the audio chain. This chart describes where analysis takes place (and is valid both for loudness analyzer and separate normalizing actions):
Options
Options can be accessed by clicking the Options button or right-clicking on the dialog. Instead of explaining them one by one here, they will get referenced throughout this documentation where appropriate.
Setting analysis target
Analyzer can work with both selected tracks or selected items. Target can be set in the options by selecting one of these:
- Analyze selected items
- Analyze selected tracks
Note that is completely possible to work with both items and tracks at the same time. If the option Clear list when analyzing is turned off, already analyzed tracks and items will never get removed from the list.
- To move edit cursor to the position of:
- True peak
- Maximum momentary loudness
- Maximum short-term loudness
- double-click respective cells in list view or right-click them and select one of "Go to..." menu entries.
- If the option Navigating to maximum short-term/momentary creates time selection is turned on, time selection will be created over measured maximum momentary/short-term loudness.
- Double-clicking other cells will move arrange to respective track or item only if the option Double-click moves arrange to track/item is turned on
- Lastly, in case you want for list selection to follow project selection of selected tracks and items make sure the option "Mirror project selection" is turned on.
Normalizing actions
It is always recommended to use loudness analyzer when doing extensive measurement and normalization because loudness analyzer caches measurements so it can normalize items and tracks much faster. But if you need to quickly normalize something you can always use these actions:
SWS/BR: Normalize loudness of selected items/tracks
SWS/BR: Normalize loudness of selected items to -23 LUFS
SWS/BR: Normalize loudness of selected items to 0 LU
SWS/BR: Normalize loudness of selected tracks to -23 LUFS
SWS/BR: Normalize loudness of selected tracks to 0 LU
Global loudness preferences
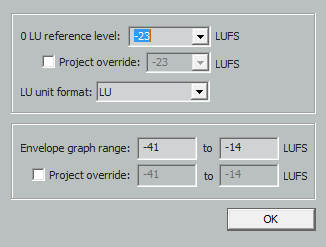
To open global loudness preferences either run the action SWS/BR: Global loudness preferences... or open Loudness analyzer and run Options > Global preferences...
Generating Reports
- The user can generate freely configurable text reports that can either be exported to a text file, or to the clipboard of the system, from which they can then be pasted in to a spreadsheet, for example.
Configuration
- Open the Loudness view from the Extension menu or via the SWS/BR: Analyze loudness...-action. The report is configured by clicking on the Options button and choosing Export Format. This configuration can be modified and recalled at any time, without losing the selection in the Loudness window. Thus, you can generate several reports from the same selection.
Analysis
- First, analyze the items you wish to generate a report on. Select the items in the timeline and click on the Analyze button. If you wish to include TruePeak measurement in the analysis, be sure to have the option to do so activated. You'll find that option by clicking on Options button and enabling the Measure True Peak (slower) option, which a checkmark will indicate.
Selection
- Select the items you wish to generate a report on by clicking on a single item in the list of analysed items in the Loudness window, and then optionally SHIFT+clicking to select a range of entries. CTRL+click can be used to add or remove single entries from.
Export
- Right-click on one of the selected entries and choose the desired Export command. Available are Export formatted list to clipboard and Export formatted list to file. The latter will ask you for a location and filename for the text file.
Format Options
- A list of available wildcards/placeholders can be studied in the SWS/BR - Loudness Export format window, which is accessed by clicking on the Options button and clicking on the Export format command.
- The configurations are saved in a list. Entries from this list can be recalled by clicking on the Wildcards button and choosing Recent patterns.
Example
- Should you wish to export a report to the clipboard, so you can paste the contents in to a spreadsheet, use the command Export formatted list to clipboard. Then switch to your spreadsheet application and paste in to a chosen location. Libreoffice, for example, will then request that provide details about the format of the pasted text.
- It is recommended that you seperate report data columns with a delimiter such as the ; character.
- An example. This line is entered in the Format of the Loudness Export Format window, that is opened via the Export format command from the Options button menu.
$target;$integrated;$truepeak;$range;$maxshort;$length;$truepeakpos;$maxshortpos
- Here is an example output for an entry from the Loudness window list:
Example Filename.wav;-23.0 LUFS;-3.1 dBTP;14.2 LU;-14.3 LUFS;542.533;284.973;405
- An example of a finished spreadsheet. Please note that the first line in the spreadsheet(row 1) is not exported, but must be prepared by the user.


