Snap and Grid Settings
From CockosWiki
Contents |
Picture
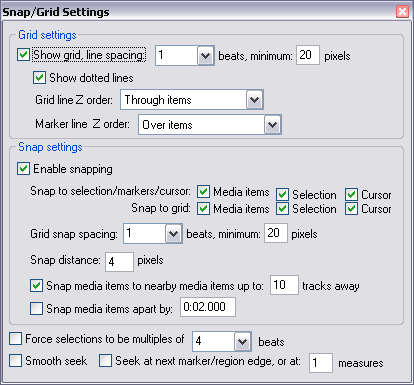
Grid Settings
- Show Grid:
This option determines if there is a grid shown or not. The grid allows you place items along the timeline at various musical intervals. It also shows where those items are in relation to musical or time intervals.
Grid Shown:
No Grid:
- Line spacing "X" beats:
This defines how far apart the grid lines are. You can put any music time division in this box.
- Minimum "x" pixels:
This determines the density of the gridlines by refernce to pixels. A higher figure here means fewer gridlines per given area.
- Grid Line Z order
This determines how the grid appears. See the pictures below for the difference:
Over items![]() Through items
Through items Under items
![]()
- Marker Line Z order
Similar to the Grid Line Z order as above, but for markers. See the pictures below for the differences:
Over items![]() Through items
Through items![]() Under items
Under items ![]()
Snap Settings
- Enable Snapping
Snap to Selection/Markers/Cursor
- Media Items - this will snap to media items, and abut other items/the cursor/loop selection against them
- Selection - when there is a loop selection made, you will be able to snap to the beginning or end of it
- Cursor - if you place a cursor down this will enable you to snap to that cursor
Snap to Grid
These options will snap the following to the grid, making aligning to time/beats easy.
- Media Items
- Selection
- Cursor
Other snap/grid settings
- Grid Snap Spacing "x" Beats
Here you can enter any beat division you wish, it will show the grid according to that division.
- Minimum "x" pixels
This shows how close something will "snap" to something else. The default is 20 pixels. Below, you will see an example of 50 pixels' difference. In between the edit cursor and the next measure is the "snap zone" where it will automatically move to the next cursor.
- Snap distance "x" pixels
- Snap media items to nearby items up to "x" pixels
- snap media items apart by 0:00.000
Other Options
- Force selections to be multiples of "X" beats.
This will "beat quantize" loop selections. Very helpful for making exact selections in a time-based piece.
- Smooth Seek
Go HERE for more info.
- Seek at next marker/region edge or at: "X" measures.
This sets a delay of a certain amount of measures for it to smooth-seek to the measure you jumped to.


