Recording Audio
From CockosWiki
| Line 3: | Line 3: | ||
{{updateMe|unfinished}} | {{updateMe|unfinished}} | ||
| - | = Recording Audio = | + | == Recording Audio == |
Coming real soon now I hope. | Coming real soon now I hope. | ||
| Line 10: | Line 10: | ||
A very simple and quick video tutorial on how to record a track in REAPER can be found here [[Tutorial_3_-_Track_Recording_Setup]] | A very simple and quick video tutorial on how to record a track in REAPER can be found here [[Tutorial_3_-_Track_Recording_Setup]] | ||
| - | = Setting up your Audio device = | + | == Setting up your Audio device == |
Go through the instructions for your soundcard/firewire/USB device and pay particular attention to the "before you start" section. Make you that any particular service pack it says it needs, or version of Windows, is installed. A clean install of Windows is a good starting point if that's possible for you. Don't install all of the supplementary drivers that come from the manufacturer of your PC. Install as little as possible, then get the soundcard working for system sounds and CDs, then the get soundcard working with REAPER. | Go through the instructions for your soundcard/firewire/USB device and pay particular attention to the "before you start" section. Make you that any particular service pack it says it needs, or version of Windows, is installed. A clean install of Windows is a good starting point if that's possible for you. Don't install all of the supplementary drivers that come from the manufacturer of your PC. Install as little as possible, then get the soundcard working for system sounds and CDs, then the get soundcard working with REAPER. | ||
| Line 29: | Line 29: | ||
[[Image:REAPER Audio Preferences.PNG]] | [[Image:REAPER Audio Preferences.PNG]] | ||
| - | = Testing Play Back= | + | == Testing Play Back== |
This is a placeholder, delete, edit, feel free | This is a placeholder, delete, edit, feel free | ||
| - | = Recording A First Track = | + | == Recording A First Track == |
A real quick video tutorial on this topic [[Tutorial_3_-_Track_Recording_Setup]] | A real quick video tutorial on this topic [[Tutorial_3_-_Track_Recording_Setup]] | ||
| - | = Setting up Monitoring = | + | == Setting up Monitoring == |
This is a placeholder, delete, edit, feel free | This is a placeholder, delete, edit, feel free | ||
| - | = Setting up Recording = | + | == Setting up Recording == |
This is a placeholder, delete, edit, feel free | This is a placeholder, delete, edit, feel free | ||
| - | = Setting up Track Input = | + | == Setting up Track Input == |
This is a placeholder, delete, edit, feel free | This is a placeholder, delete, edit, feel free | ||
| - | = Conclusion = | + | == Conclusion == |
This is a placeholder, delete, edit, feel free | This is a placeholder, delete, edit, feel free | ||
Revision as of 14:31, 30 June 2011
Main Page > REAPER Documentation
This page needs updating.
Please update the page (How to edit a page?)
If you have updated the page, or examined it and found the information up-to-date, please remove this box.
Contents |
Recording Audio
Coming real soon now I hope.
This whole section has been blank for some time, so I thought I'd start something off from the view point of a beginning REAPER user. I've taken the section headings from the Recording MIDI section for the moment and will add to them, and change, and delete as time allows.
A very simple and quick video tutorial on how to record a track in REAPER can be found here Tutorial_3_-_Track_Recording_Setup
Setting up your Audio device
Go through the instructions for your soundcard/firewire/USB device and pay particular attention to the "before you start" section. Make you that any particular service pack it says it needs, or version of Windows, is installed. A clean install of Windows is a good starting point if that's possible for you. Don't install all of the supplementary drivers that come from the manufacturer of your PC. Install as little as possible, then get the soundcard working for system sounds and CDs, then the get soundcard working with REAPER.
Use the ASIO driver that came with your card, if there was one. Use ASIO4ALL if there wasn't one. Reaper will work with some very basic audio h/w and that's good - but it doesn't mean it's recommended.
Don't fire up REAPER until you have your sound card playing system sounds and playing CDs, you won't break anything if you ignore this but you'll have difficulty tracking down any problems.
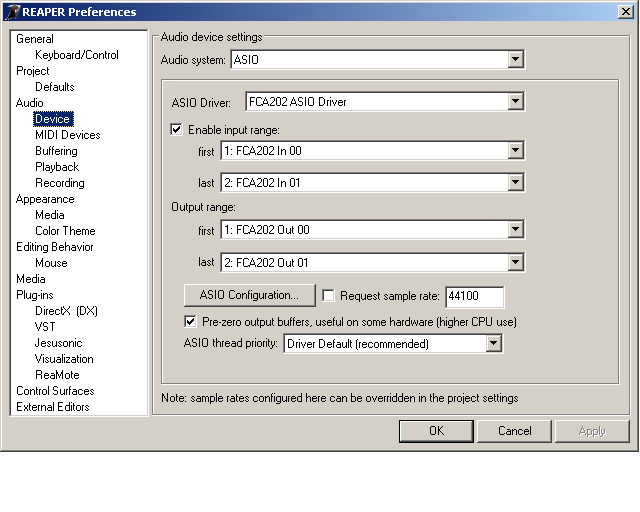
In REAPER then
- choose Options/Preferences/Audio/Device
- Audio System: Choose ASIO if you have it
- Put a tick in the "Enable input range" check box
- Choose the starting and finishing values for input ranges in the drop down lists
- Then choose the starting and finishing values for output ranges in the drop down lists
- Leave everything else at the default settings for the moment
Testing Play Back
This is a placeholder, delete, edit, feel free
Recording A First Track
A real quick video tutorial on this topic Tutorial_3_-_Track_Recording_Setup
Setting up Monitoring
This is a placeholder, delete, edit, feel free
Setting up Recording
This is a placeholder, delete, edit, feel free
Setting up Track Input
This is a placeholder, delete, edit, feel free
Conclusion
This is a placeholder, delete, edit, feel free
Main Page > REAPER Documentation
