Options Menu Bar
From CockosWiki
m (→Ripple Editing: really fixed it this time) |
(Small grammer changes) |
||
| Line 11: | Line 11: | ||
This will record as normal, no punch. | This will record as normal, no punch. | ||
*Loop Selection Auto Punch | *Loop Selection Auto Punch | ||
| - | This will punch in only at the loop selection. | + | This will punch in (record) only at the loop selection. |
*Auto-Punch Selected Items | *Auto-Punch Selected Items | ||
With this you can select a number of items and Reaper will record into those items when the timeline reaches them. | With this you can select a number of items and Reaper will record into those items when the timeline reaches them. | ||
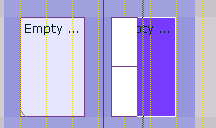
| - | Below there is an example of two empty events. The second one is being recorded | + | Below there is an example of two empty events. The second one is being recorded into on the track. |
[[Image:Fillevent.png]] | [[Image:Fillevent.png]] | ||
| Line 58: | Line 58: | ||
==Enable Snapping== | ==Enable Snapping== | ||
| - | This will toggle snapping to the grid. Items will snap to the specified grid locations. That is to say that they will snap to the grid lines. The amount of 'snap' will depend on the resolution that you specify in the snap settings. If you turn this off, items will move | + | This will toggle snapping to the grid. Items will snap to the specified grid locations. That is to say that they will snap to the grid lines. The amount of 'snap' will depend on the resolution that you specify in the snap settings. If you turn this off, items will move free of the grid and will not snap to the lines. |
==Show Grid== | ==Show Grid== | ||
| Line 70: | Line 70: | ||
==Locking Enabled== | ==Locking Enabled== | ||
| - | This will | + | This will turn locking on or off. When this is off, none of the locking rules apply. |
==Locking Settings== | ==Locking Settings== | ||
| Line 90: | Line 90: | ||
==Smooth Seeking (Seeks at end of Measure)== | ==Smooth Seeking (Seeks at end of Measure)== | ||
| - | With this option enabled, seeking is totally changed, especially for projects aligned to the grid. If you want to jump from one part of the time line to another without playing in between those parts then enable this, and go to the measure you want to hear next. It wont move there right away, but after the measure | + | With this option enabled, seeking is totally changed, especially for projects aligned to the grid. If you want to jump from one part of the time line to another without playing in between those parts then enable this, and go to the measure you want to hear next. It wont move there right away, but after the measure you are on is over. Then it will smoothly go to the later part making a seamless transition. It will smoothly seek the next part, without pausing. This can be handy for trying different chorus or verse combinations etc. |
=Media/Peaks= | =Media/Peaks= | ||
| Line 99: | Line 99: | ||
*'''Build Peaks''' | *'''Build Peaks''' | ||
| - | If the items in your projects | + | If the items in your projects don't have peaks built, this is the command you need. |
*'''Rebuild Peaks''' | *'''Rebuild Peaks''' | ||
Revision as of 13:59, 1 March 2007
Main Page > REAPER Documentation > Menu Options/Commands
Track Menu
Record Mode
- Normal
This will record as normal, no punch.
- Loop Selection Auto Punch
This will punch in (record) only at the loop selection.
- Auto-Punch Selected Items
With this you can select a number of items and Reaper will record into those items when the timeline reaches them. Below there is an example of two empty events. The second one is being recorded into on the track.
Options
Ripple Editing
Ripple editing is a good way to perform an edit within a busy timeline and maintain sync relationships. When you perform a ripple edit, you are essentially adjusting the duration of a clip by manipulating its start and finish points. By doing so, the clips beyond the edit points are adjusted by the same value as your adjustment to that item.
[| Click Here For a GREAT tutorial on ripple editing]
- Off
This is the default mode. Items will not shift when you perform edits on a track.
- One Track
If you select the ripple editing option once, it will select 'one track' ripple editing. This means anything you do to items on that track will affect other items of the same track. flash example below:
- All Tracks
If you select the ripple editing option twice, it will enable All tracks ripple editing. This means anything you do to ANY of the items on ANY track will affect the ENTIRE project. Helpful for deleting entire sections of songs.
Flash example below:
The above examples are macromedia flash files... you may need to left click, then right click and press play.
Media Item Auto Crossfades
Auto Crossfades make it so that when you slide one item into another, MIDI or audio, an automatic fade is created between them. Below are more flash examples:
- Off
- On
Item Grouping
This will toggle Item Grouping. Grouped items will move and be edited together. If this is turned off, the grouping will cease to work and they will move independently.
Enable Snapping
This will toggle snapping to the grid. Items will snap to the specified grid locations. That is to say that they will snap to the grid lines. The amount of 'snap' will depend on the resolution that you specify in the snap settings. If you turn this off, items will move free of the grid and will not snap to the lines.
Show Grid
This will show the lines of the grid in order to line items up with it.
Snap/Grid Settings
Go here for information:
Locking Enabled
This will turn locking on or off. When this is off, none of the locking rules apply.
Locking Settings
Metronome Enabled
Enables Metronome
Metronome Settings
Move Envelope Points With Media Items
This will move the envelopes along with any movement of the items that they are associated with-- Normally envelopes are statically placed on a track and stay put wherever an item is moved.
Automatically Scroll View During Playback
During Playback/Recording - when the playback reaches the end of the screen, it will move to the next screen over automatically, so that you dont have to manually follow the play/record point.
Smooth Seeking (Seeks at end of Measure)
With this option enabled, seeking is totally changed, especially for projects aligned to the grid. If you want to jump from one part of the time line to another without playing in between those parts then enable this, and go to the measure you want to hear next. It wont move there right away, but after the measure you are on is over. Then it will smoothly go to the later part making a seamless transition. It will smoothly seek the next part, without pausing. This can be handy for trying different chorus or verse combinations etc.
Media/Peaks
Peaks
- Build Peaks
If the items in your projects don't have peaks built, this is the command you need.
- Rebuild Peaks
This will clear the current peaks and rebuild them
- Remove All Peaks (and do not rebuild)
This will just remove all the peaks.
Media
- Set all Media Online
This will enable all your media items as online -- Your audio device will thereby be able to playback and access those media items.
- Set all Media Offline
This will manually set all the items offline. This may be neccessary, for instance, to free a driver for another program. You wont be able to hear the items in your project if this option is on.
View
- Always on Top
Keeps REAPER on Top over all other applications.
- Fullscreen
This extends the borders of REAPER's workspace and enables it to use more screen real estate on your monitor.
- Color Themes
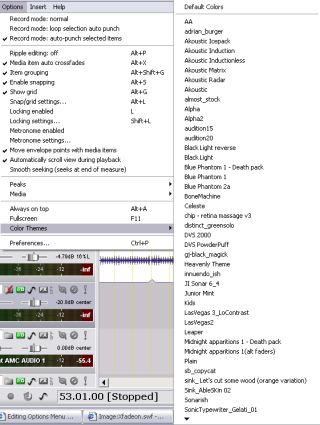
You can select from a number of different and some quite amazing color themes from this list.
Preferences
go here for more info.
Main Page > REAPER Documentation > Menu Options/Commands


