Contextual toolbars with SWS
From CockosWiki
m (→About) |
m (→About) |
||
| Line 1: | Line 1: | ||
==About== | ==About== | ||
| - | This is the documentation on SWS features regarding contextual toolbars. You need to have pre-release version of [[SWS extension]] installed, version 2.5.1.0 or later. You can get it [http://sws.mj-s.com/ here]. All coding by [http://forum.cockos.com/member.php?u=27094 Breeder]. [https://www.paypal.me/ReaBreeder Support the developer here]<br> | + | This is the documentation on SWS features regarding contextual toolbars. You need to have pre-release version of [[SWS extension]] installed, version 2.5.1.0 or later. You can get it [http://sws.mj-s.com/ here]. All coding by [http://forum.cockos.com/member.php?u=27094 Breeder]. [https://www.paypal.me/ReaBreeder Support the developer here ]<br> |
==Basic concepts== | ==Basic concepts== | ||
Revision as of 21:23, 25 September 2018
Contents |
About
This is the documentation on SWS features regarding contextual toolbars. You need to have pre-release version of SWS extension installed, version 2.5.1.0 or later. You can get it here. All coding by Breeder. Support the developer here
Basic concepts
Feature relies heavily on existing REAPER toolbars. The basic concept is fairly simple. User assigns different REAPER toolbars to different contexts (things like TCP, item, piano roll, etc...) and loads them under mouse cursor by calling a single action. The action will then load an appropriate toolbar for an object under the mouse cursor.

There are multiple advantages to this kind of workflow:
- There is only one shortcut to remember
- Since toolbar is loaded under mouse cursor, user doesn't have to do a lot of mouse movement
- High number of contexts allows for a smaller toolbars, making toolbar buttons easier to find and click
Setting up
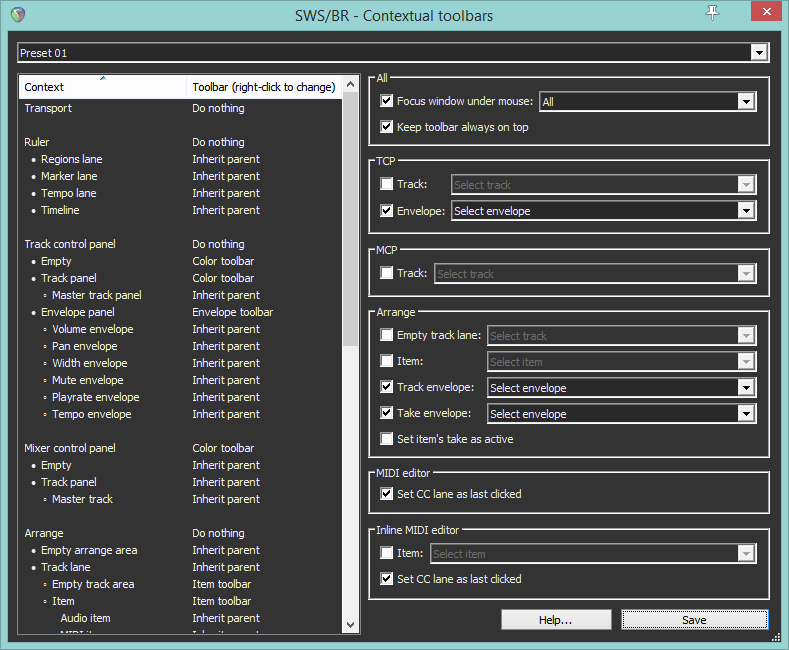
Contextual toolbars dialog
To open contextual toolbars dialog, either run the action SWS/BR: Contextual toolbars or go to Main menu > Extensions > Contextual toolbars...

Dialog is divided into 3 parts:
- Preset selector at the top. There are 8 presets. Each preset is tied to corresponding SWS action that will load toolbars based on how things are set up here for each preset
- Contexts list view on the left. Here we set which toolbar is loaded for each context. Simply select an entry and right click it to set corresponding toolbar for it
- Various options on the right. These are executed on toolbar load
Understanding context hierarchy
There are multiple context groups, separated by an empty space. They are:
- Transport
- Ruler
- Track control panel
- Mixer control panel
- Arrange
- MIDI editor
- Inline MIDI editor
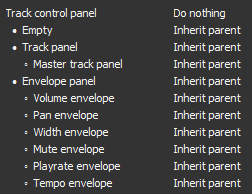
To explain how these work, we'll have a look at Track control panel group:

Top entry, Track control panel represents the whole TCP, including track panels, envelope panels and empty TCP space. It functions as the parent for it's 3 subgroups:
- Empty
- Track panel
- Envelope panel
Each subgroup can be set to 3 different states. For example, Envelope panel can be set up in the following way:
- Do nothing - if mouse is over Envelope panel nothing will happen, even if Track control panel has a toolbar assigned to it
- Inherit parent - Envelope panel will follow whatever is set up under Track control panel (naturally, the highest parent (in this case Track control panel) cannot be set up to inherit parent since it has none)
- Override it's parent by setting up a corresponding toolbar for it - Envelope panel will load one toolbar, and it's parent Track control panel the other
This hierarchy repeats every time a group get's divided into subgroups, For example, Envelope panel is the parent of Volume envelope, Pan envelope etc...
Understanding options
Options are divided into multiple groups in regards to context groups. The only exception is the first group All which is valid for all contexts. All other groups are tied to specific main group of contexts. TCP is relevant only for Track control panel, MCP for Mixer control panel etc...
Each option has a check box to turn it on, and optionally a dropdown menu with various entries.
All groups should be self explanatory, but first one All might need some explanation:
- Focus window under mouse allow you to focus window under mouse cursor. If you call the appropriate SWS action from MIDI editor, but mouse cursor is over item, arrange will get focused.
- Keep toolbar always on top is actually an indirect fix for this bug. If you're using frameless toolbars, it is recommended you turn it on.
Special cases: item stretch markers and take envelopes
If you look at the group Arrange, you will notice that these two contexts are sharing the same level as Item:
- Item stretch markers
- Take envelope
It is true that take envelopes and stretch markers belong to items, but putting all of them under item would mean we would have to repeat all of them for each item subgroup (put all take envelopes under Audio item and then again under MIDI item etc...). Since contexts count is high as it is, it would only clutter the interface.
However, sometimes you want to have one toolbar for Audio item and one toolbar for MIDI item without differentiating if mouse is over take envelope or item itself. That's the reason these 2 contexts have a 4th state called Follow item context.
Setting any of these contexts to Follow item context will effectively ignore them and treat them as the item to which they belong to.
How to load toolbars
Once the arbitrary preset has been set up, search the action list for any of these actions:
- SWS/BR: Exclusive toggle contextual toolbar under mouse cursor
- SWS/BR: Open/close contextual toolbar under mouse cursor
Find the action tied to the preset you previously set up and assign a shortcut to it. Note that these actions are available in all sections of the Action list.
Open/close actions work as toggle switches. If any of the toolbars set up in Contextual toolbars dialog is visible, all of them will get closed - otherwise toolbar corresponding to context under mouse cursor will get loaded.
Exclusive toggle actions are a bit different. They always show the toolbar for whatever context is at mouse cursor while automatically closing all other toolbars. If context under mouse cursor is unassigned, or toolbar for that context is already visible, the toolbar will get closed. For example, if TCP toolbar is visible, running the action to toggle Ruler toolbar will automatically close TCP toolbar and show Ruler toolbar. If you now call the same action while mouse is still at ruler, ruler toolbar will get closed and no other toolbar will be shown.
In case you want multiple toolbars for the same contexts, it is recommended to set up multiple presets and then assign them to different shortcuts. For example, item toolbar for setting volume, fades etc...can be set to shortcut C and item toolbar for rendering/gluing etc... can be set to shortcut Ctrl+C.
Related REAPER settings
REAPER stores all toolbar position info in window screensets. Once you set up contextual toolbars the way you like it, it is recommended to save everything to one default window screenset. Note that if you use multiple windows screensets you will have to resave them all. Instead of manually resizing each toolbar and resaving screensets, you can also edit reaper-screensets.ini manually (make sure to close REAPER beforehand) by copy-pasting toolbar data from one screenset (where you already set up toolbar sizes) to other screensets.
In case you want for one of your screensets to get loaded every time REAPER is started, just set up a template project and assign it a startup action that loads the desired screenset. To set the startup action, search the action list for SWS/S&M: Set project startup action. Note that it's much more convenient to create one custom action and assign that as a startup action. This way, whenever you need to change something, it is enough to update that one custom action instead of updating existing template and other related projects.
You might also wonder how toolbars in the gif from the beggining of this wiki have no frames. That's also an option of REAPER. To turn it on, go to Preferences->Appearance and check Frameless floating toolbar windows